Showing posts with label Soaked Flour. Show all posts

Tuesday, April 13, 2010

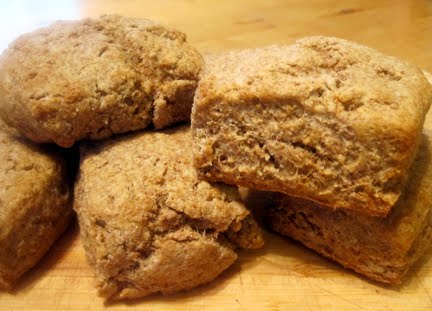
Simple Whole Wheat Biscuits

I love biscuits! They're easy to make and I almost always have all the ingredients on hand. I probably make biscuits every week, typically to accompany our dinner meal. They take about 15 minutes to make and only about 12 minutes to bake, so you can easily whip them together for any meal and enjoy their deliciousness straight from the oven. Plus if you have leftovers, and that's a big if, they are great warmed up in the morning for breakfast. My favorite way to eat biscuits is straight from the oven with a pat of butter and a bit of honey. Yum, yum, yum! Honestly you can't go too wrong here. You can get creative too by adding cheddar cheese, jalapenos, fresh or dried herbs, etc.

I use to always make the traditional white flour biscuit, where you cut in butter to make a flaky, tender biscuit. I still make these, especially for company, but I also wanted to have a recipe that followed some of the Weston Price methods of preparing breads. To do that, I got rid of the milk you'd normally use and instead mix the flour with yogurt. If you are a believer of soaking your grains before you bake/eat them, you can easily do this with this recipe. Simply mix your flour and yogurt together the night before you want the biscuits, cover and let the mixture sit on the counter until the next day when you are going to use them. If you are new to soaking grains, the main purpose is to help aid in their digestion. I go back and forth on whether to soak grains or not, there are different theories about this topic and I'm still in research mode. For now I soak my grains part of the time, and the rest of time I don't worry about it. Here is one article you can read about why to soak grains called Be Kind to Your Grains, it's from the The Weston Price Foundation website.

Since I wanted to make this a "grain soaking" friendly recipe, I also got rid of cutting your butter into the flour mixture, which is what you would normally do. Instead, I use melted butter. All in all, with the changes I made this is a very simple recipe to make and completely worth the little bit of mess that comes with it.


What You'll Need - 8 biscuits

  • 2 cups organic whole wheat flour - I like to use freshly ground, white whole wheat
  • 3/4 cup plain organic yogurt
  • 1 tsp. aluminum-free baking soda
  • 1 1/2 tsp. aluminum-free baking powder
  • 1 tsp. sea salt
  • 4-8 Tblsp. organic butter, melted - The more the fat the yummier they are!
  • Mixing bowl
  • Mixing spoon
  • Flour to use on work surface, about 1/4 cups is suffice
  • Cookie sheet, greased or lined with parchment paper
  • Knife


Getting Started

1. Preheat your oven to 450 degrees.

2. Mix all your dry ingredients together in your mixing bowl, then add your yogurt and melted butter. Use a mixing spoon or your fingers to mix all the ingredients together. Your dough will be very moist and sticky. If you decided to soak you flour in the yogurt over night, just add all your ingredients to the soaked mixture and continue with the rest of the instructions.


3. Dust a working surface with a generous amount of flour and dump your dough out onto it. Pat the dough into a rectangular shape that is about 3/4" thick.


4. Cut the rectangle into 8 square/rectangle biscuits. You could use a round biscuit cutter, but why bother. Who decided that biscuits should be round instead of square our rectangle? When you make your biscuits round, you have scraps leftover that have to be re-shaped and cut again. Typically you get a tougher biscuit out of these scraps because the dough is worked too much when you have to re-shape them. Plus, it takes more time to make round biscuits. Typically when I'm making biscuits, I doing them at the last minute and the faster I can get them done the better.


5. Place biscuits onto cookie sheet about 2" apart and bake for approximately 12 minutes, until they are golden brown on the edges.

6. Remove from the oven and enjoy while they are still warm. It works great to place the hot biscuits into a bowl lined with a towel and then cover the biscuits with the towel until you serve them. This way they stay warm and are able to melt the generous slabs of butter you'll be placing on them! :-)
Tuesday, February 2, 2010

Pancakes!


For those people who know me really well, they'll likely know about the special place pancakes have in my heart! Before I had my son and a more structured routine it would not be a surprise if you wandered into my home and saw me eating pancakes at 9:00 at night as my "dessert" (at least hopefully it was my desert and not just dinner)!

Now they make their appearance on the weekends accompanied with a delicious breakfast. I thought I'd include the recipe on pancakes now because they contain the two foods I just showed you how to make in the last week.

This pancake recipe does take a bit of planning just because you start it the night before you want to eat them. It is taken from Sally Fallon's cookbook Nourishing Tradition. This is an excellent cookbook for those who are interested in informing themselves on traditional methods of cooking. It also contains a wealth of information on nutrition and where Westerners have gone wrong with their diets. I highly recommend it, even if you aren't a cook, for the nutritional information it contains. If you are able to get your hands on it, know that it takes baby-steps to fully embrace all of the cooking techniques. They are very different from what we are accustomed to in America and many of the recipes contain ingredients that the majority of us have never heard of. It's helpful to have a local co-op near-by, as many of the ingredients she uses could be purchased at one, versus at the local grocery store. She also gives resources in the back of the cookbook to help you purchase items that aren't readily available.

What You'll Need (This recipe makes about 10-15 pancakes)
  • 2 cups whole wheat or spelt flour, preferably freshly ground (I used spelt for this batch)
  • 2 cups plain yogurt, kefir or 1 1/2 cups of buttermilk (the original recipes says two cups buttermilk, but I think it makes the pancakes to thin and then you are left adding more flour the next morning)
  • 2 eggs
  • 1/2 teaspoon salt
  • 1 teaspoon baking soda
  • 2 tablespoons melted butter, plus more for cooking the pancakes in
  • Medium size bowl
  • Mixing spoon or whisk
  • Large frying pan
  • 1/3 measuring cup

Getting Started

The night before you want to enjoy your pancakes, mix your flour with your yogurt, kefir or buttermilk. Cover the bowl and leave it on the counter or in a warm place for 12 to 24 hours. Strange huh? I promise you won't get sick from leaving yogurt, kefir or buttermilk out on the counter! : - ) This step helps breakdown the phytic acid, complex starches and proteins in the flour to ease digestion and helps your body more easily absorb the vitamins found in grain.

In the morning when you're ready to prepare your pancakes, add the rest of the ingredients listed above, mixing with a little milk or water (if necessary) to achieve the desired consistency. Below is a picture of what my batter looked like once all the ingredients were mixed together. If your batter is too thin, you may want to add a bit more flour. The thinner your batter is the thinner your pancakes will be.


Next, melt several tablespoons of butter in a skillet and using your 1/3 measuring cup, scoop out the batter and pour into skillet. I personally think medium is about as high as you want to cook these pancakes. They cook more slowly than traditional pancakes and you don't want the outside to get overly done and be left with a doughy inside. Yuck! All the normal pancake rules apply when trying to decide when to flip these babies. Wait until the pancakes are beginning to bubble some and the edges are becoming slightly cooked.

The picture below shows the batter still needs to cook for a couple more minutes before flipping the pancakes.


Since we aren't cooking in a professional kitchen and instead make our pancakes in batches, turn your oven on to 170-200 degrees and put an oven proof plate or a cookie sheet in the oven. As your pancakes finish cooking, throw them into the oven while you cook the rest of the batter. This way you'll have deliciously warm pancakes and the butter that you MUST put on top, because it's just oh-so-good, will melt and soak right in! : - ) Yum!

To mix things up, try adding blueberries or other fresh fruit to your pancake batter. Pecans and walnuts are also excellent. If you prefer a little sweeter batter, you could try adding 1-2 tablespoons of sugar or Rapadura. All of these additions should be made in the morning right before you cook the pancakes.

When it's all said and done just be sure to top your pancakes with butter and some organic maple syrup and enjoy! Oh, if you have left-overs, these store great in the freezer or fridge. My favorite way to reheat them is in the toaster. They get warm on the inside and just slightly crisp on the outside – a little like waffles.