Showing posts with label Whole Wheat Bread. Show all posts

Sunday, November 20, 2011

The easiest sourdough bread recipe I know (NO KNEADING!) that many have asked me to share and it can be done with 100% whole wheat!

I wish I could claim this recipe as my own, but I cannot. I am not a sourdough bread maker guru. More like stumbling my way through successes and failures as I practice learning the true nature of my sourdough starter. This recipe comes from Jules at Stone Soup - Delicious Healthy Meals In Minutes. If you head over to her site (as I did today to grab the link for the recipe) you'll see a place to enter your email to receive updates. When you do this you'll get two of her e-cookbooks for free. Can't complain about that!


This is another one of those favorite "go to" recipes that I use time and time again and that I make for my family on a regular basis. These recipes aren't fancy, but they are good and when I'm a bit uninspired in the kitchen, not feeling good and overly tired, which has been true a lot lately, these are the dishes or items I find easiest to make and don't require a lot of thinking on my part.

I've decided that when it comes to sourdough baking, a lot of practice and not getting too hyped up if things don't turn out will lend to a much more peaceful kitchen. Unlike using yeast and white flour recipes where you can treat every recipe exactly the same, sourdough starters have a little mind of their own. Depending on the environment they are maintained in, how often they are fed (yep, just like pets, they really do need to be fed and watered preferably about 2 times a day), at what point after the feeding you choose to use the starter, how long you let your dough "sour" and what temperature it is in your home, you will get different results with your recipes. Now for some this sounds like a nightmare, but honestly it's not, it just teaches you flexibility and as you make more sourdough items you learn how to best use your starter.

What I love about this particular recipe is that it's so easy. Honestly, anyone who knows how to make a couple of measurements can quickly throw together the dough for this bread in about 5 minutes. About 8-12 hours later you should have a sticky mass of dough ready to be baked. No kneading ever needs to be done and out of the oven in 45 minutes you have an absolutely delicious, rustic loaf of bread with a crunchy exterior and a soft, slightly sour and a bit moist interior.

Sunday, October 17, 2010

Pizza 4 Ways and How to Make Pizza Sauce, Mozzarella & Italian Sausage


Pizzas range from Chicago-style deep-dish to the authentic Italian Neapolitan thin-crusts. Depending on what part of the country you're from you can find every topping and style imaginable, including sauce on the bottom, on the top and no sauce at all. Without a doubt though, the best pizzas around, no matter the style, are the ones made by hand using only the freshest ingredients. Below I've included four of my favorite styles of pizzas. Of course I can't stop at just sharing recipes for making your own crusts, so I've also included how to make your own whole-milk mozzarella, red pizza sauce and sweet Italian sausage. 

Monday, May 3, 2010

Whole Wheat Tortilla Recipe & a Cheater White Flour Recipe Too! (-:

About a year ago I made my first batch of homemade tortillas. I have to say that once you've had them homemade, its very hard to go back to the store bought ones. Homemade tortillas are much lighter even with whole wheat flour, and frankly they're pretty easy to make. The first round or two can be a bit time consuming as you get used to rolling the dough out and baking it, but you quickly get the hang of it and can get into a good rhythm. Once you do that, you'll fly through making them.

I am doing my best to use whole wheat flour as much as possible, but there are those times when white flour is so good in a recipe that you can't help but use it at least occasionally or perhaps for guests who aren't accustomed to whole wheat products. So you'll see a white flour recipe below too! It's not my own recipe, I found it on the internet, but don't remember where so I can't give credit where credit is due.

One thing to note. A lot of tortilla recipes have you cook the tortillas on the stove. I've actually never done it this way before as the white flour tortilla recipe I first started using had you cook the tortillas in the oven and that's how I've always done it. It's very easy and goes extremely quick. From what I've read, to cook tortillas on the stove, heat a cast iron skillet and place tortilla in it, cook on each side until slightly browned. If you do it this way, let me know how it turns out.


What You'll Need:


Whole Wheat Flour Tortillas #1
- no knead version, makes eight 8"-10" tortillas
  • 2 1/4 cups organic whole wheat flour
  • 1 tsp. aluminum-free baking soda
  • 1/2 tsp. sea salt
  • 2 tbsp. olive oil
  • 1 cup plain organic yogurt


Whole Wheat Flour Tortillas #2 - makes six 8" tortillas or eight 6" tortillas
  • 1 1/2 cups organic whole wheat flour
  • 1 1/2 tsp. aluminum-free baking soda
  • 1/2 tsp. sea salt
  • 2 tbsp. olive oil
  • 1/4 cups + 2 tbsp. organic milk


White Flour Tortillas - makes eight 8"-10" tortillas
  • 2 cups organic, unbleached white flour
  • 1 1/2 tsp. aluminum-free baking soda
  • 1 tsp. sea salt
  • 2 tsp. olive oil
  • 3/4 cup organic milk

For all the recipes you'll also need:
  • Large mixing bowl
  • Mixing spoon
  • Sharp knife
  • Plastic wrap or medium size bowl
  • Rolling pin
  • Pizza stone or cookie sheet
  • Measuring cups and spoons
  • 2 plates
  • Wax paper - optional
  • Tongs or spatula
  • A couple of towels to wrap tortillas in

Getting Started


1. With your pizza stone or cookie sheet inside, preheat your oven to 500 degrees.

Note: put your cookie sheet upside down in the oven if it has a lip of any kind. This will make it easier to get your tortilla on and off of it.

2. In your large bowl, mix together all of your dry ingredients, then add your olive oil and milk or yogurt. Mix all ingredients together until a moist, but not sticky ball can be made from them. If your dough is too dry add a bit more milk/yogurt or if it's too wet then add a bit more flour.

3. Turn dough out onto a clean, lightly floured working surface and kneed for a couple of minutes. In the case of the first recipe, you can skip this step.


4. Cover the dough with some plastic wrap or a bowl for about 10 minutes then cut into 8 pieces and shape into small balls. Cover the balls and let sit for about 20 minutes. You could skip the sitting times, but I've found it's much easier to roll the dough out when you do this step.


5. Take one of your balls of dough and flatten into a round disk with your hands, then place on a floured work surface. Using your rolling pin, roll the dough out as thin as possible, rotating the dough several times during the rolling process so it doesn't stick to the work surface. If you leave the dough too thick you'll have something more similar to a pita then a tortilla once it's been baked.


6. Dust each tortilla with flour and place on a plate, stacking them as you go. If you are concerned they'll stick together (which happened to me once), place a sheet of wax paper in between each one. Alternatively, roll out two tortillas, bake them and while the two are baking roll out two more. You have to work pretty quickly to do it this way, but it does work.

7. Okay, so this next step takes a little practice. Take one or two of your tortillas and put them directly on the pizza stone or cookie sheet. Bake it for about 30- 45 seconds. Yep, that's it. Once they start to bubble up, they're done. You can flip them once if you think they need it, but don't over cook them, especially the whole wheat ones. Use your tongs or spatula to remove them from the oven then wrap them in a couple of towels to keep them warm while you bake the rest. The towels will also keep them moist so they are easier to roll-up later on.

Now time to enjoy them with your favorite filling or with a slather of butter!

Tuesday, April 13, 2010

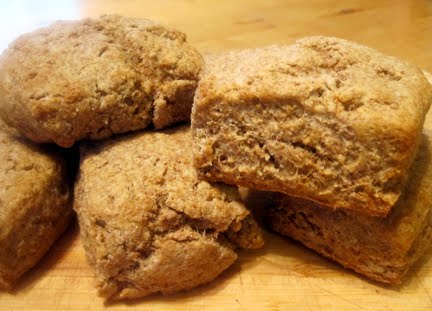
Simple Whole Wheat Biscuits

I love biscuits! They're easy to make and I almost always have all the ingredients on hand. I probably make biscuits every week, typically to accompany our dinner meal. They take about 15 minutes to make and only about 12 minutes to bake, so you can easily whip them together for any meal and enjoy their deliciousness straight from the oven. Plus if you have leftovers, and that's a big if, they are great warmed up in the morning for breakfast. My favorite way to eat biscuits is straight from the oven with a pat of butter and a bit of honey. Yum, yum, yum! Honestly you can't go too wrong here. You can get creative too by adding cheddar cheese, jalapenos, fresh or dried herbs, etc.

I use to always make the traditional white flour biscuit, where you cut in butter to make a flaky, tender biscuit. I still make these, especially for company, but I also wanted to have a recipe that followed some of the Weston Price methods of preparing breads. To do that, I got rid of the milk you'd normally use and instead mix the flour with yogurt. If you are a believer of soaking your grains before you bake/eat them, you can easily do this with this recipe. Simply mix your flour and yogurt together the night before you want the biscuits, cover and let the mixture sit on the counter until the next day when you are going to use them. If you are new to soaking grains, the main purpose is to help aid in their digestion. I go back and forth on whether to soak grains or not, there are different theories about this topic and I'm still in research mode. For now I soak my grains part of the time, and the rest of time I don't worry about it. Here is one article you can read about why to soak grains called Be Kind to Your Grains, it's from the The Weston Price Foundation website.

Since I wanted to make this a "grain soaking" friendly recipe, I also got rid of cutting your butter into the flour mixture, which is what you would normally do. Instead, I use melted butter. All in all, with the changes I made this is a very simple recipe to make and completely worth the little bit of mess that comes with it.


What You'll Need - 8 biscuits

  • 2 cups organic whole wheat flour - I like to use freshly ground, white whole wheat
  • 3/4 cup plain organic yogurt
  • 1 tsp. aluminum-free baking soda
  • 1 1/2 tsp. aluminum-free baking powder
  • 1 tsp. sea salt
  • 4-8 Tblsp. organic butter, melted - The more the fat the yummier they are!
  • Mixing bowl
  • Mixing spoon
  • Flour to use on work surface, about 1/4 cups is suffice
  • Cookie sheet, greased or lined with parchment paper
  • Knife


Getting Started

1. Preheat your oven to 450 degrees.

2. Mix all your dry ingredients together in your mixing bowl, then add your yogurt and melted butter. Use a mixing spoon or your fingers to mix all the ingredients together. Your dough will be very moist and sticky. If you decided to soak you flour in the yogurt over night, just add all your ingredients to the soaked mixture and continue with the rest of the instructions.


3. Dust a working surface with a generous amount of flour and dump your dough out onto it. Pat the dough into a rectangular shape that is about 3/4" thick.


4. Cut the rectangle into 8 square/rectangle biscuits. You could use a round biscuit cutter, but why bother. Who decided that biscuits should be round instead of square our rectangle? When you make your biscuits round, you have scraps leftover that have to be re-shaped and cut again. Typically you get a tougher biscuit out of these scraps because the dough is worked too much when you have to re-shape them. Plus, it takes more time to make round biscuits. Typically when I'm making biscuits, I doing them at the last minute and the faster I can get them done the better.


5. Place biscuits onto cookie sheet about 2" apart and bake for approximately 12 minutes, until they are golden brown on the edges.

6. Remove from the oven and enjoy while they are still warm. It works great to place the hot biscuits into a bowl lined with a towel and then cover the biscuits with the towel until you serve them. This way they stay warm and are able to melt the generous slabs of butter you'll be placing on them! :-)

Wednesday, March 10, 2010

100% Whole Wheat Sandwich Bread

Have you ever tried to look for a 100% whole wheat sandwich bread recipe? There are plenty of whole wheat bread recipes, but they aren't suitable for sandwiches, at least not in the way we are accustomed to. Sandwich bread should be rather light, not overly crumbly and be a bit "flexible" so it can hold up when putting spreads and toppings on it. Almost every recipe I found used part white flour (they use part white flour because it has a higher gluten content than whole wheat, thus making a softer, lighter bread), which I'm trying to not use in my kitchen. The other recipes added gluten or powdered milk, two ingredients I always avoid.

This is what started me on my day of experimenting with my own bread recipes. By round 3 I had a bread that worked well for sandwiches and had good flavor. I've included all three recipes below, so you can see the difference between them. You can also see pictures comparing the different bread recipes at the end of this post. They all tasted good, but varied in density. Actually, my husband loved the flavor of recipe number 1, probably because it's made with all milk and butter, instead of water. It would work good for an open face sandwich or a slicing bread to put jam and butter on, but it would be much too dense to be a traditional sandwich bread. The ingredients are the same for all three recipes, it's the proportions that change.

If you are new to making bread and don't have good results your first time, DON'T GIVE UP! Bread making is an art form and it requires patience to learn all the skills required to achieve a fantastic end product. I've been making bread fairly regularly for the last couple of years, but started experimenting back in high school (I graduated in '98, so it's been awhile) and I'd say I'm still in the beginning of the learning process as I teach myself the do's and don'ts of bread baking. Since I am teaching myself, I'd say it's taking me longer to master bread making, but I also feel like I have a better idea of what I'm doing correctly or incorrectly. One great thing about making bread is as long as it rises at least some and you don't burn it, typically it's perfectly fine to eat, just denser and not the perfect texture you were hoping for. I probably have at least 6 experimental loaves of bread in my freezer right now, the most recent two loaves being all spelt flour. The goal was 100% spelt flour sandwich bread, instead I ended up with a nice tasting, but overly-dense bread. They aren't perfect, but they taste good and I know we'll eat them. Especially since I have baby number two due to be born in the next week or so. I'm pretty sure baking bread will not be at the top of my list for a while. Also, I could hardly justify experimenting on bread recipes (especially financially) if I couldn't be fairly confident I could eat the end results. Thus far, the only time I've thrown away bread was when I was trying to master a sourdough recipe from the cookbook Nourishing Tradition. The bread was so hard I could have used it as bricks. The point is, give bread making a try, you might have awesome success the first time and congratulations if you do! If not, keep working at it – it's worth it. Fresh home-baked bread is too awesome to not try your hand at, at least a couple of times.


What You'll Need
- makes 2 loaves of bread

Bread Recipe #1
- great flavor but too dense for sandwich bread


Bread Recipe #2 - much better consistency, but a bit crumbly and still too dense


Bread Recipe #3 - The WINNER for sandwich bread

Other items you'll need

Getting Started

These instructions are for recipe #3, but can be used for all three recipes if you want to try the other ones out.

Mix your yeast and 1/2 cup warm water together in a small bowl. Allow to stand for at least 5 minutes and up to 15 minutes so the yeast has time to fully dissolve. As your yeast dissolves, you should see some activity in your bowl, like bubbles and foam/froth. If you don't, it could mean you have bad yeast or your water was too cold or hot. I'd pitch the yeast mixture and start over.

In a small pot, melt your butter, then add your water, milk, honey and salt. Stir until honey and salt are dissolved and your milk/water are warm (105 - 115 degrees).

Pour the milk/water mixture into your large mixing bowl and add your yeast mixture. Stir everything together. Add 4 1/2 cups of your flour and then stir until everything is thoroughly mixed together. At this point start adding 1/4 - 1/2 cup of flour at a time and use your hands to mix everything together. You could use a Kitchen Aid with a dough hook or something along that line at this point, but if you are new to making bread, I strongly recommend using your hands. This helps you feel how moist your dough should be and gives you a better idea of when to stop adding flour. If you are wondering why there isn't a specific amount of flour for this recipe or for most bread recipes, that's because there can't be. Humidity, how you measure out your flour and liquid ingredients, etc. all play a factor in how much flour you'll need in the end. This is where bread-making becomes an art form. When you first start making bread, it can be hard to know how much flour to add. Here are a couple rules of thumb. First, only add enough flour to your dough while it's in the bowl to get the dough to hold together nicely. It should still be pretty sticky. Then dump the dough onto a well-floured kneading surface and start kneading in small amounts (1/4 cup works good) of flour at a time. Once your dough is beginning to get a nice, smooth consistency that doesn't stick all over the place, stop and wash your hands and scrape any dough up off your working surface. Why? When your hands and working surface are sticky and covered in dough, you have a greater tendency to add too much flour to your dough because it keeps sticking to everything. When your hands and work surface are clean, the dough won't stick as much and it will give you a more true idea of how much more flour you need to add. In the end the dough should be smooth, moist and just a bit sticky.


Once you've added enough flour, it's time to start kneading. This is another skill that takes time to develop, but I think it's much easier to get the hang of this part than knowing how much flour to add. Interestingly enough, I think I learned how to knead dough when I was a ceramic student in college. When I first started in ceramics I had no idea that you had to "knead" the clay to increase it's elasticity. The techniques of kneading clay versus dough are a bit different, but in the end you're using basically the same movements. Using the palm of your hands and starting in the center of the dough, push the dough forward, thinning it out and then pull it back and fold it over the middle. Rotate the dough a little bit and do it again. You keep doing this for about 10 minutes until the dough is smooth and has become somewhat elastic. Whole wheat dough will never be as elastic as white flour dough (just an FYI if you're used to working with white flour). Don't think you can skip out on this part either. You are developing the gluten in the bread at this point. If you don't do this step your bread won't rise properly.


Wash out your mixing bowl and pour enough olive oil into it to coat the bottom. Shape your dough into a nice ball and place the smooth side down into the bowl, coat it with oil and then turn it over so that the whole ball of dough has oil on it. This keeps your dough from sticking to the bowl while it rises.


Cover your bowl loosely with a piece of plastic wrap and then place in a warm spot, around 80 degrees if possible, and let the dough rise until doubled. This usually takes about 1 1/2 hours. If your kitchen is cool, it will likely take longer. Don't so much worry about the time, just make sure the dough doubles in size. Once it has risen sufficiently, punch down the dough (aka, deflate the dough of the air in it) with your fist.


Divide the dough in half and shape each half into small loafs. Tuck any seams under the bottom of the loaf and then place into your well-greased loaf pans. Spread a little bit of olive oil on the dough and then loosely cover with plastic wrap. Allow to rise for a second time, until doubled and you have a nice dome top that comes up around 1" over the top of the loaf pan. This normally takes about an hour.

While your dough is rising for the second time, go ahead and preheat your oven to 350 degrees. I'd do this at least a 1/2 hour before you are going to bake your bread, even if it doesn't take your oven that long to heat up.

Place your risen loaves into the oven and bake for 40 minutes. To test if your bread is done, you can stick a thermometer into the bread. Your are looking for an internal temperature of 190 degrees. Once done, remove from oven and then remove the bread from the pan and allow to cool. I'd let the bread cool for at least 1/2 - 1 hour before trying to slice it. Sandwich bread slices better when it's completely cool. Now enjoy! I hope you have success with your bread baking. If you try this recipe, let me know how it turns out for you.


Below are pictures showing the results of all three bread recipes. Recipe number 3 is on the far left and recipe number 1 is on the far right. Amazing how much the rising varied.